Stand Back!
Phase Transition of High Carbon Steel
Time: 15 minutes
Materials and Supplies:
Piano wire 10" length, 0.016" diameter, of high-carbon steel, obtained from an instrument store (or hardware store)
VARIAC- source of variable AC voltage, 0-120 V, 0-5 amps
3 alligator clip lead wires
2 ring stands
2 adjustable single burette clamps
1 meter stick
metal weight - of about 40-60 grams
AC ammeter - 0-5 amps
Extension cord - UL rated at over 5 amps (heater cord)
2- #3 or #4 1 hole rubber stoppers
2- 6" strips of copper wire, #12 or #14 gauge (household wire)
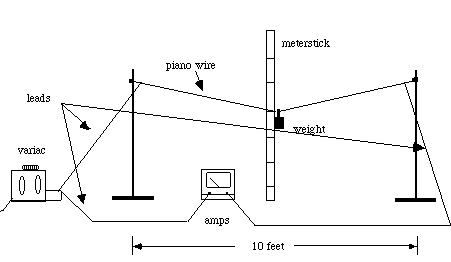
Diagram of Set-up:
Procedure:
Set up the equipment as shown in Figure A. Attach one rubber stopper to each clamp. Thread one end of the piano wire up through the hole in the rubber stopper, and bend the ends over, or otherwise secure the wire to the stopper. The rubber stopper acts as an insulator between the electric circuit and the metal ring stand to prevent electric shock. Slide the metal weight over the other end of the wire, and attach this end of the wire to the rubber stopper. The metal weight should slide to the middle of the wire, causing the wire to hang down. Tape a meter stick to the table so you can read the height of the weight from the floor.
Make sure the VARIAC is unplugged, off, and the dial set at zero. The VARIAC will have one wire with a standard 120 V male plug on the end. This wire will be plugged into the wall receptacle. (LATER) The VARIAC will also have a standard 120 V female receptacle or a second wire. If the VARIAC has a standard female receptacle, you can plug the extension cord into it. Force the two pieces of copper wire into the female end of the extension cord. (Strip off the insulation.) Alligator clip lead wires will attach these wires to the rest of the circuit. Attach one lead wire to each of the copper wires. Attach the other end of one lead wire to the piano wire, about 2" below the rubber stopper. Attach the other end of the second lead wire to one terminal on the ammeter. Then attach the third lead wire to the other terminal on the ammeter and to the other end of the piano wire (about 2" below the rubber stopper). The purpose of the ammeter is to allow you to adjust the amount of current flowing through the circuit, so neither the VARIAC nor the circuit breaker is overloaded.
Now you have a complete circuit from the VARIAC to the piano wire. Check your circuit with Figure A. READ THE FOLLOWING EXPLANATION OF THE PROCEDURE COMPLETELY BEFORE YOU ATTEMPT TO PERFORM THIS DEMONSTRATION.
Plug the extension cord into the VARIAC. Make sure the dial on the VARIAC is set to zero and the switch is in the OFF position. Plug the VARIAC into the wall receptacle. Turn the switch on the VARIAC on. Now you are ready to heat the piano wire by making an electric current flow through it. As the voltage is increased, the current increases (I = V/R), and the wire gets hot (Power = I2R). However, in the beginning, the cold wire has a low resistance, so only a small voltage is needed to produce the 5 amp current needed to heat the wire red hot. This is why you SLOWLY turn the dial on the VARIAC, carefully watching the ammeter so as not to exceed 5 amps. As the wire heats, you will have to increase the voltage (turn the dial clockwise) to approximately 40 - 60 volts to maintain a current of 4.6 to 4.8 amps. The wire should be red hot, and will have expanded. An observer can watch the wire expand, by watching the metal weight lower along the meter stick. At this point, the weight will be at its lowest point. If you turn off the VARIAC (FLIP THE SWITCH) and turn the dial to zero, the wire will cool and contract, moving the weight up the meter stick. When the temperature of the wire cools to 720 ° C, the weight will hesitate, then continue rising as the wire continues to cool and contract. The hesitation should be very noticeable; this is when the metal undergoes the transformation from FCC to BCC crystalline structure. Heating the wire takes less than 2 minutes, and cooling the wire takes less than 30 seconds.
NOW YOU ARE READY TO PERFORM THIS DEMONSTRATION.
Note: If 5 amps are insufficient to heat the wire above 750 ° C, use a finer gauge wire.
Note: As the wire is cycled through the experiment several times, the carbon content will be reduced as the carbon burns off at high temperatures. This decreases the sharpness of the phase change (which occurs over a wide range of temperatures rather than a single temperature, and is obscured by the thermal expansion). Thus, it will be necessary to replace the wire occasionally.
Optional Apparatus:
You may be able to use a toaster or other electric heating appliance (with a heater coil) wired in series with the piano wire. The darkness control on the toaster can be used as a potentiometer to control the voltage drop across the piano wire. This way you can use a single pole light switch (120 V), and eliminate the need for a VARIAC. The success of this method depends on reducing the voltage drop across the toaster enough, so the voltage drop across the piano wire will be large enough to heat the wire above the transformation temperature. This sounds challenging however.
Discussion
The crystalline structure of iron is different at different temperatures, and high-carbon steel alloys undergo a transformation from BCC to FCC in a very small temperature range. An interesting application of this theory is in determining the maximum temperature to which a piece of steel has been heated before it changes phases. By studying the crystal structure of a piece of metal, you can determine what transformations have occurred. Since these phase transformations occur over specific temperatures ranges, you can determine the heat history of the metal. This information can be useful in determining how close the material was to failure. One result of the Three-Mile Island incident was that some of the nuclear fuel was so hot, that it melted. Small pieces of molten nuclear fuel dropped to the floor of the containment vessel. As the fuel cooled, the steel floor became very hot. By examining the crystal structure of samples of the floor, metallurgists could determine the maximum temperature the metal reached. This information gave the design engineers an idea of the maximum amount of heat and stress the steel containment vessel will experience, if part of the cooling system of the reactor fails.